There Are No Income Items to Allocate Click Next to Continue
Cost Centre or Profit Centre Allocation
You can maintain your incomes and expenses, as per different business units, employees, projects, departments, and so on, using the Cost Centre capability in TallyPrime. You can have one or more cost centres or profit centres in your company, as needed, and allocate the breakup of incomes and expenses to different cost centres or profit centres. TallyPrime provides reports that help you to view income and expense groups with the profit centre or cost centre allocations made under each group. Similarly, there are reports displaying list of cost centres or profit centres along with the corresponding incomes and expenses under each cost centre or profit centre. You can also allocate the same income or expense to different sets of cost centres in parallel, say employee-wise as well as project-wise, by using Cost Category for the respective Cost Centres.
Create & group cost centres: Like other Masters, such as Stock Group, Stock Category, Godown, and Ledger Group, you can create individual cost centres or multiple cost centres in a hierarchy.
Note: You can use cost centres to create a hierarchy of different business units, and continue to see details of the expenses at the top level as well as at each individual level.
Create cost category: If an expense or income is allocated to one cost centre or profit centre in your business and the same is also allocated to a different cost centre for reporting purposes, you can use the Cost Category feature in TallyPrime. This help for parallel allocation of the same amount across different cost centres or profit centres and view them accordingly – cost category-wise.
Reports: The Cost Centre Breakup report gives you the view of incomes and expenses incurred for a particular cost or profit centre in your business. You can also explore other cost centre reports and view allocations cost centre-wise, month-wise, and so on. As in any other report, you can explode and drill down to view the details. At the last level of drill-down, you can alter the contributing transactions, if needed.
Use Cost Centres or Profit Centres for Allocation of Incomes and Expenses
If you have incomes and expenses, such as staff welfare, projects, employees, payment recovery, conveyance, and so on, and want to maintain them as per business unit, employee, project, department, and so on, you can use the cost centre capability in TallyPrime that enables you to allocate incomes and expenses to cost centres or profit centres in your business.
In order to use this capability, create Cost Centre.
In this section
- Create Cost Centres one-by-one
- Create multiple cost centres in one go
- Cost centre allocation in transactions
Create Cost Centres
If you are creating Cost Centre for the first time, TallyPrime prompts you to enable Cost Centre for the company. These cost centres or profit centres will be available for allocation while recording transactions.
- Gateway of Tally > Create > Cost Centres > press Enter.
Alternatively, press Alt+G (Go To) > Create Master > Cost Centres > press Enter.
In case the feature is inactive, you will be prompted to activate the Cost Centres feature. Select Yes or press Y to proceed. - Name & alias: Provide a name. As in other masters, you can specify multiple aliases.
- Under: Select Primary or an existing cost centre.
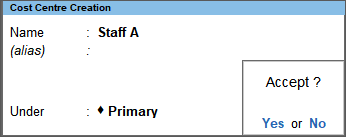
What you see on the screen can vary based on your choices. Press F12 (Configure) to change the options. Alternatively, press Ctrl+I (More Details) to enter any of the values without activating the F12 options. - Accept the Cost Centre master. As always, you can use Ctrl+A to save.
Click here to see the possible F12 Configurations.
While you are creating a cost centre or profit centre, if there is a need to create another Master, say a Stock Item or a Bank Ledger, press F10 (Other Masters) and switch to the desired master screen. After creating the other Master, you can continue from the same place on the Cost Centre screen where you had left last.
Create multiple cost centres or profit centres in one go
You can create multiple cost centres from one screen. Use the multi-master creation and alteration feature for this.
- Gateway of Tally > Chart of Accounts > Cost Centres > press Enter.
- Press Alt+H (Multi-Masters) > select Multi Create > and press Enter.
In case the feature is inactive, you will be prompted to activate the Cost Centres feature. Select Yes or press Y to proceed. - Enter the Name of Cost Centre and select the cost centre under which it is being created. You can also select Primary cost centre.

- Accept the Cost Centre master. As always, you can use Ctrl+A to save.
To alter multiple cost centres in one-go,
- Gateway of Tally > Chart of Accounts > Cost Centres > press Enter.
- Press Alt+H (Multi-Masters) > select Multi Alter > select the cost centre or Primary > and press Enter.
- Update the details as needed.

- Accept the Cost Centre master. As always, you can use Ctrl+A to save.
Cost centre or profit centre allocation in transactions
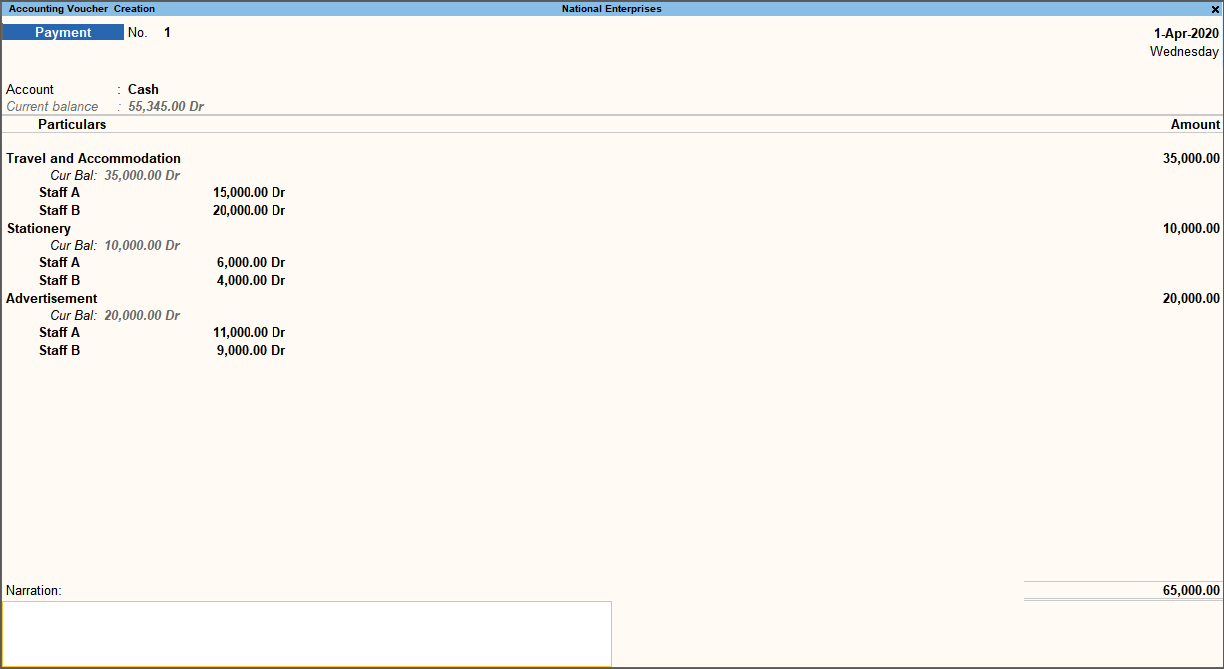
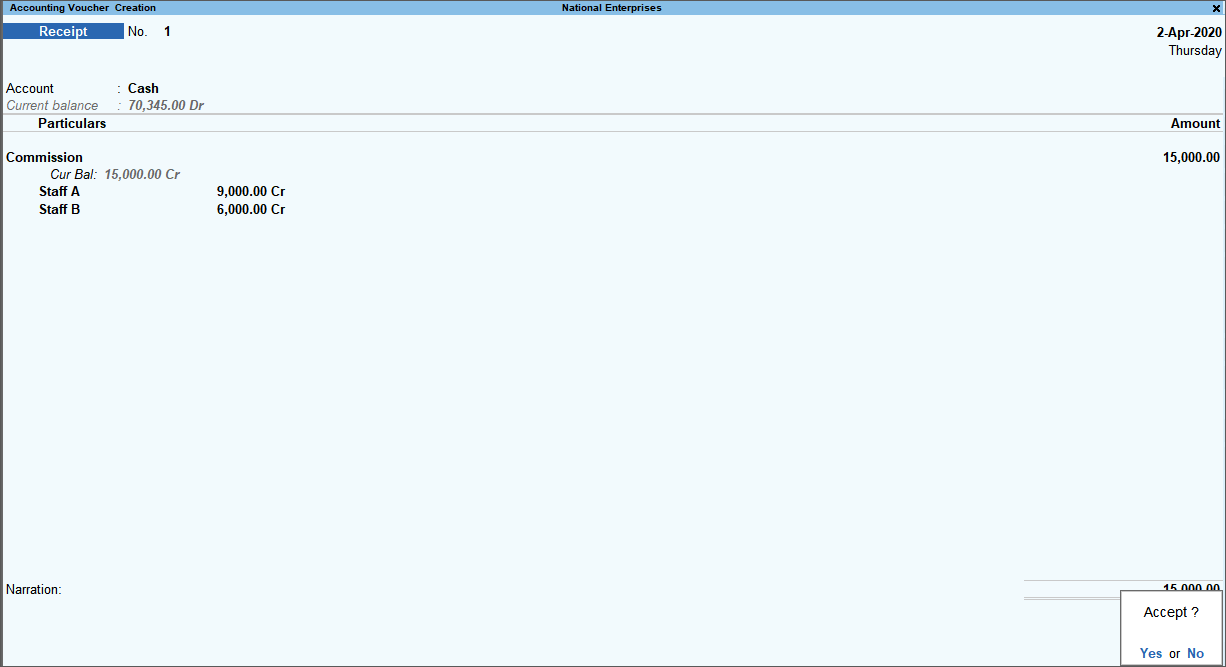
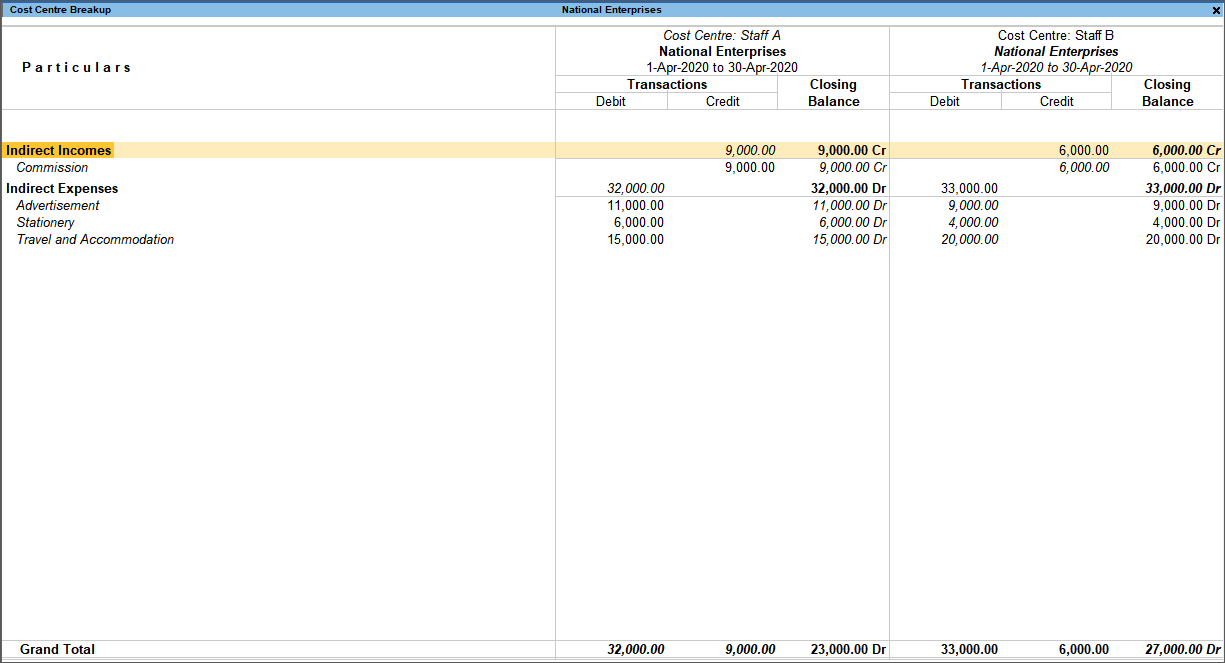
Consider the example of staff members – Staff A and Staff B – travelling across the country to conduct events, such as training and demo sessions at the client location. The expenses incurred by the Staff A and Staff B are: Travel expenses of Rs. 15,000 and Rs. 20,000; purchase of stationery items worth Rs. 6,000 for Rs. 4,000; and advertisement expenses of Rs. 11,000 and Rs. 9,000, respectively. These expenses can be recorded by allocating the amounts to the respective cost centres or profit centres – Staff A, Staff B. At the same time, the company also received commission as income of Rs. 15,000. Allocate Rs. 9,000 to Staff A and Rs. 6,000 to Staff B. Similarly, you can create more than one cost centre group, as needed to allocate expenses and incomes and view the bifurcation of the total amount cost centre-wise.
Before recording a transaction, ensure that the option Cost Centres are applicable is set to Yes in the corresponding ledgers. By default, this option is set to Yes in the income and expense ledgers, whereas it is set to No in the asset and liability ledgers.
Once you create a cost centre, TallyPrime will prompt you to allocate your incomes or expenses to the relevant cost centres or profit centres when recording transactions. You will need to allocate the total expenses or incomes against one or more cost centres or profit centres. You can also allocate cost centres or profit centres to party ledger, sales account, and so on. The payment voucher with cost centre or profit centre allocation, appears as shown below:
What you see on the screen can vary based on your choices. Press F12 (Configure) to change the options. Alternatively, press Ctrl+I (More Details) to enter any of the values without activating the F12 options.
The receipt voucher with cost centre or profit centre allocation, appears as shown below:
Use Cost Centre Groups to View Business Unit-wise Allocation
As always, you can create multiple cost centres or profit centres in a hierarchy to get a consolidated view of the allocation made to each business unit, employee, project, department, and so on.
To get a hierarchy of cost centres as in the sample for Staff A and Staff B:
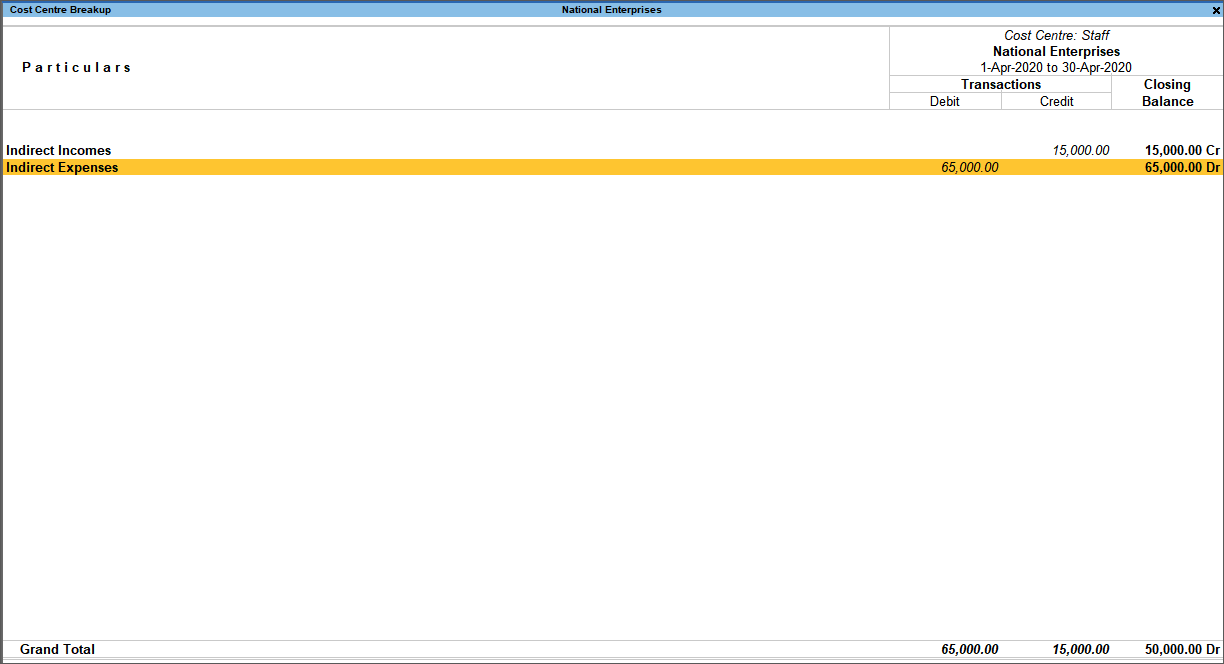
Track Income and Expenses Incurred Cost Centre-Wise
The Cost Centre Breakup report gives you the income and expense allocated to the selected cost centre or profit centre. As in any other report, you can explode and drill down to view the details for a particular profit centre. At the last level of drill-down, you can alter the contributing transactions, if needed.
In the section
- Breakup of Cost Centre
- Cost Centre Summary
- Cost Centre Monthly Summary
Breakup of Cost Centre
Press Alt+G (Go To) > type or select Breakup of Cost Centre.
Alternatively, Gateway of Tally > Display More Reports > Statements of Accounts > Cost Centres > Cost Centre Break-up.
The Cost Centre Breakup report, gives you the ledger-group-wise view of incomes and expenses incurred and allocated to the selected cost centre or profit centre.
What you see on the screen can vary based on your choices. Press F12 (Configure) to change the options and F11 (Features) to enable or disable features.
Explode/Collapse
Compare Business Data Using Cost Centre Capability
TallyPrime enables you to compare incomes and expenses incurred in a particular cost centre or profit centre to the others. You can compare the cost centre details by adding columns. For example, if you want to compare the ledger-wise details of Staff A and Staff B, open the Cost Centre Breakup report for Staff A, press Alt+C (New Column) and select Staff B.
What you see on the screen can vary based on your choices. Press F12 (Configure) to change the options and F11 (Features) to enable or disable features.
- Press Alt+N (Auto Column) to repeat the columns of the current report based on the selected option.
- If you want to compare data of more than one company using auto column button, select Company as the type. The Company option is available when more than one company is open.
- Additionally, you can alter the columns using Alt+A (Alter Column) and delete columns using Alt+D (Delete Column).
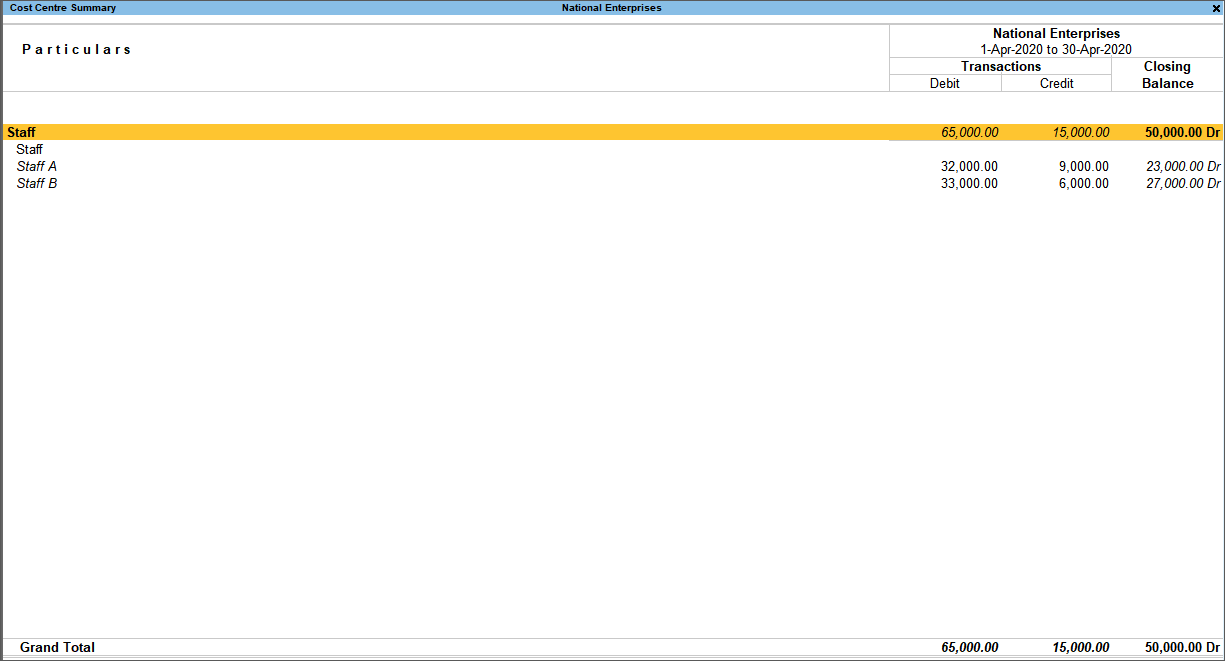
Cost Centre Summary
Press Alt+G (Go To) > type or select Cost Centre Summary.
Alternatively, Gateway of Tally > Display More Reports > Statements of Accounts > Cost Centres > Cost Centre Summary.
This report displays the summary of incomes and expenses allocated to different cost centres or profit centres.
The detailed view (press Alt+F5) of the report appears as shown:
What you see on the screen can vary based on your choices. Press F12 (Configure) to change the options and F11 (Features) to enable or disable features.
If you have been using cost centres without creating any cost category, TallyPrime considers all cost centres under an internal category called Primary Cost Category.
Cost Centre Monthly Summary
Press Alt+G (Go To) > type Cost Centre Monthly Summary.
Alternatively, you can drill-down from the Cost Centre Summary report.
You can view the monthly breakup of income and expense details along with the closing balance for the selected cost centre.

What you see on the screen can vary based on your choices. Press F12 (Configure) to change the options and F11 (Features) to enable or disable features.
Select the required month and press Enter, to view the Cost Centre Vouchers report.

Use Cost Category for Parallel Allocation
If you allocate the same incomes and expenses to parallel sets of cost centres or profit centres, create cost categories for parallel allocation.
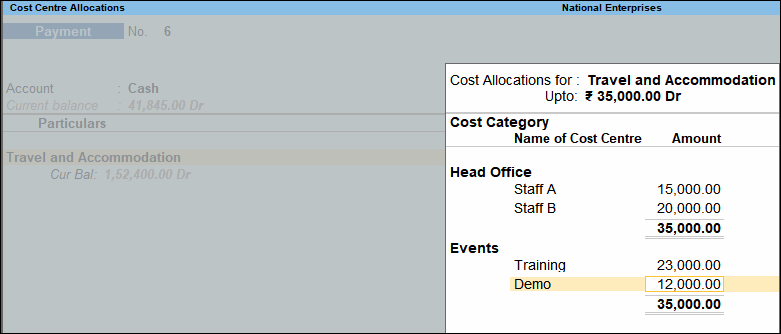
For example, as explained earlier for cost centres, the expenses incurred by Staff A and Staff B can be allocated in parallel for the purpose of training and demo. Create Head Office as a Cost Category for the cost centres Staff A and Staff B. Similarly, create Events as the Cost Category, with Training and Demo as cost centres or profit centres. While recording the travel expense of Rs. 35,000 (as per the earlier example), allocate Rs. 15,000 to Staff A and Rs. 20,000 to Staff B under the category Head Office. In parallel, allocate the same Rs. 35,000 for Training (Rs. 23,000) and Demo (Rs. 12,000). Similarly, you can do parallel allocation for stationery and advertisement expenses or commission For Stationary of Rs. 10,000, allocate Rs. 6,000 for Staff A and Rs. 4,000 for Staff B (under Head Office), and in parallel allocate Rs. 7,000 for Training and Rs. 3,000 for Demo (under Events).
TallyPrime considers all cost centres under an internal category called Primary Cost Category. When you create another cost category, all your earlier transactions will reflect under it.
You can rename the Primary Cost Category any time. As in the case of other masters, if you alter anything in Cost Category Masters, the changes will reflect in corresponding transactions and reports. You can delete a cost category if no cost centre or profit centre has been grouped under it.
Note that after you have created another cost category, you can group the cost centres under the cost category of your choice, including the default Primary Cost Category.
Create Cost Category
By default, cost centres created for your business's cost centres or profit centres in TallyPrime are grouped under Primary Cost Category. So, when you create a Cost Category in TallyPrime for the first time, you are prompted to alter the existing internal Primary Cost Category that has all the Cost Centres grouped.
- Gateway of Tally >Create > type or select Cost Category > press Enter. You can also create Cost Category from Gateway of Tally > Chart of Accounts.
Alternatively, press Alt+G (Go To) > Create Master > type or select Cost Category > press Enter.
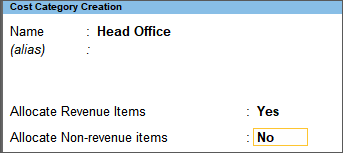
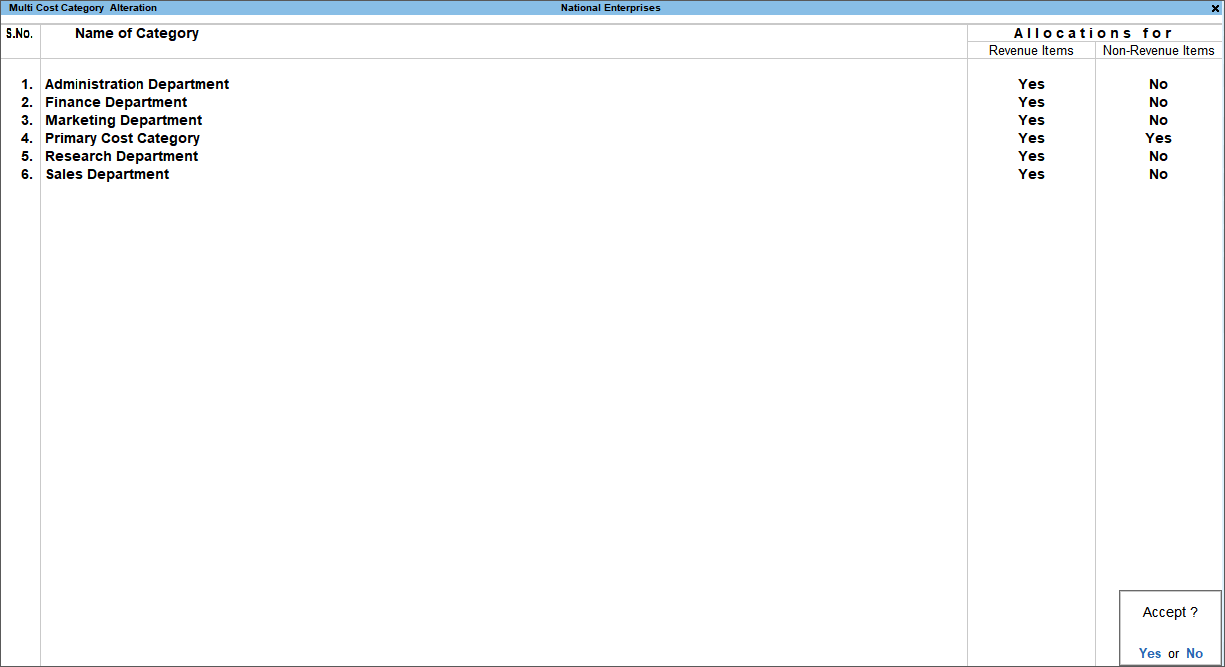
When only the Primary Cost Category is available, you will be prompted to create new Cost Category or alter the existing Primary Cost Category. Select Create or press C to create a new cost category. - Name & alias: As in other masters, you can specify multiple aliases.
- Allocate Revenue Items & Allocate Non-revenue items – Ensure that one of these options is set to Yes.
Note: Revenue items are all your expenses and incomes and non-revenue items are assets and liabilities. TallyPrime provides the flexibility to group cost centres or profit centres for non-revenue items under cost category, if needed.
What you see on the screen can vary based on your choices. PressF12 (Configure) to change the options. Alternatively, press Ctrl+I (More Details) to enter any of the values without activating the F12 options.
Fields on the Cost Category master will appear or disappear based on the changes you make using F12 (Configure). You can try different F12 (Configure) options to suit your business needs. Disabling an option will not impact your business data in any way. - Accept the Cost Category screen. As always, you can use Ctrl+A to save.
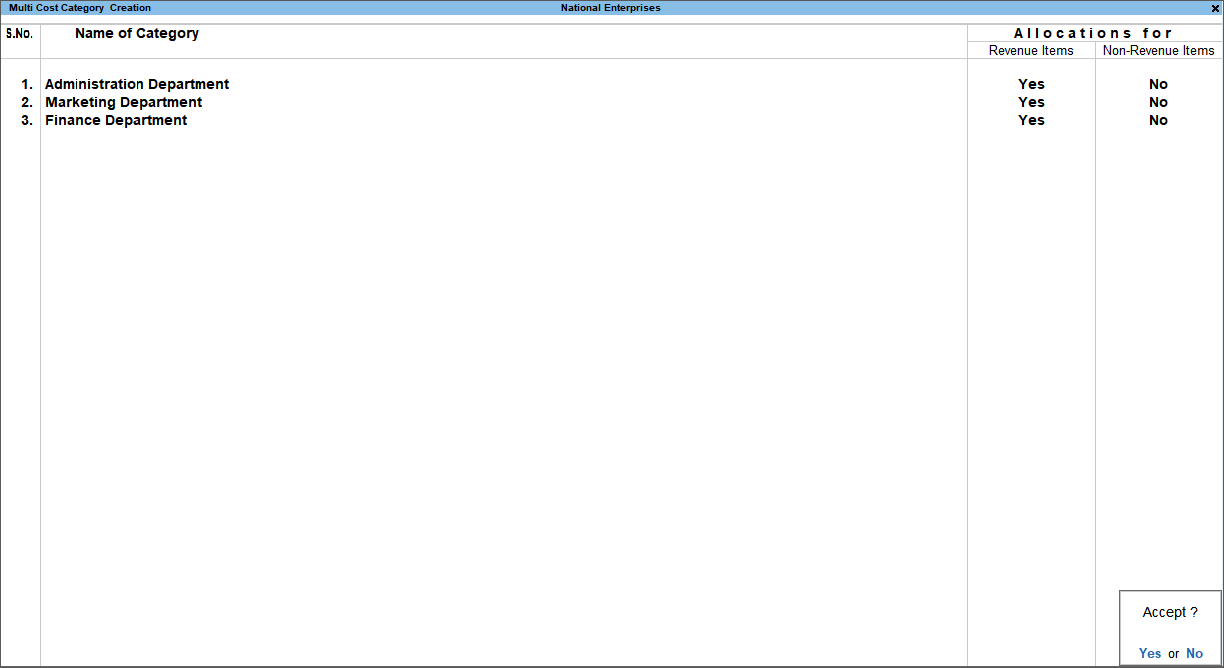
Create multiple cost categories in one-go
You can create multiple cost categories from one screen. Use the multi-master creation and alteration feature for this.
- Gateway of Tally > Chart of Accounts > Cost Categories > press Enter.
In case the feature is inactive, you will be prompted to activate the Cost Categoryfeature. Select Yes or press Y to proceed. - Press Alt+H (Multi-Masters) > select Multi Create > and press Enter.
- Enter the Name of Cost Category and allocate it to Revenue Items or Non-Revenue Items as needed.
- Accept the Cost Category master. As always, you can use Ctrl+A to save.
To alter multiple cost categories in one go,
- Gateway of Tally > Chart of Accounts > Cost Categories > press Enter.
- Press Alt+H (Multi-Masters) > select Multi Alter > and press Enter.
- Update the details as needed.
- Accept the Cost Category master. As always, you can use Ctrl+A to save.
Use Cost Category in Cost Centres
Once you have created a Cost Category, this will appear for selection when you create or alter a cost centre created for your business's cost centre or profit centre.
- In the cost centre creation/alteration screen, under Category, select the cost category of your choice.
Press Backspace on the Name field to place your cursor on the Category field.

What you see on the screen can vary based on your choices. Press F12 (Configure) to change the options. Alternatively, press Ctrl+I (More Details) to enter any of the values without activating the F12 options.
Parallel Allocation of Cost Centres or Profit Centres in Transactions
Before recording a transaction, in the corresponding ledgers, ensure that the option Cost centres are applicable is set to Yes. By default, this option is set to Yes in the income and expense ledgers, whereas it is set to No in the asset and liability ledgers. In the transaction, the total amount entered for the ledger, for example Travel, must be allocated to the selected cost centres.
When you create more than one cost category and have cost centres or profit centres under it, the cost categories along with their respective cost centres will appear for selection during parallel allocation of incomes and expenses. A sample Cost Centre Allocations screen appears as shown below:
What you see on the screen can vary based on your choices. PressF12 (Configure) to change the options and F11 (Features) to enable or disable features. Alternatively, press Ctrl+I (More Details) to enter any of the values without activating the F12 options.
Cost Category Summary
Press Alt+G (Go To) > type or select Cost Category Summary.
Alternatively, Gateway of Tally > Display More Reports > Statements of Account > Cost Centres > Category Summary.
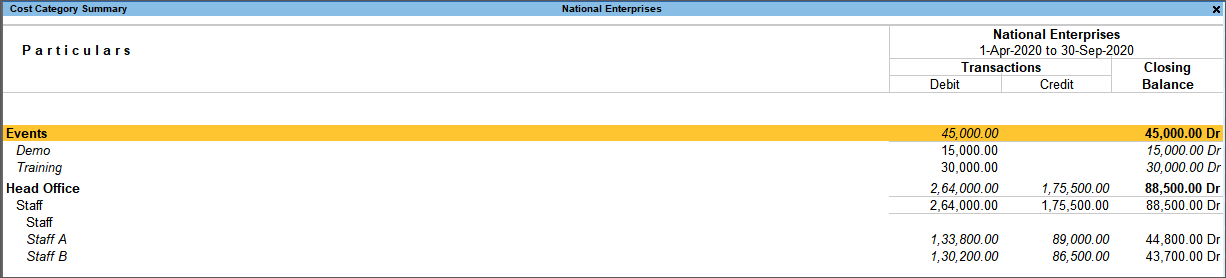
This report displays the summary of incomes and expenses allocated to parallel set of cost centres or profit centres in your business.
What you see on the screen can vary based on your choices. Press F12 (Configure) to change the options and F11 (Features) to enable or disable features.
Cost Centre Class
You may want to predefine the allocation of incomes and expenses to each cost centre or profit centre, which can be automatically applied during voucher entry. You can do this in TallyPrime using the cost centre class. While recording the voucher, the allocation will be automatically done as per the details defined for the cost centre class.
In this section
- Create Cost Centre Class
- Use Cost Centre Class
Create Cost Centre Class
You can create the required structure for a cost centre or profit centre and define the cost centre class.
- Press F11 (Features) > Ctrl+I (More Details) > type or select Cost Centre Class.
In case the feature is inactive, you will be prompted to activate the Cost Centres Class feature. Select Yes or press Y to proceed. - Type the Class Name, and select the Categories and the respective cost centres created for your business's cost centres or profit centres. Specify the percentage of allocation.
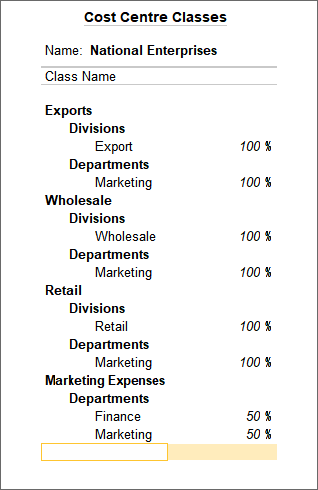
In the above example, the cost centres (Export, Retail, Finance and Marketing) are allocated at predefined percentages for:
- Cost centre classes – Exports, Wholesale, Retail and Marketing Expenses.
- Cost categories – Divisions (with cost centres Export, and Retail) and Departments (with cost centres Finance and Marketing).
Use Cost Centre Class
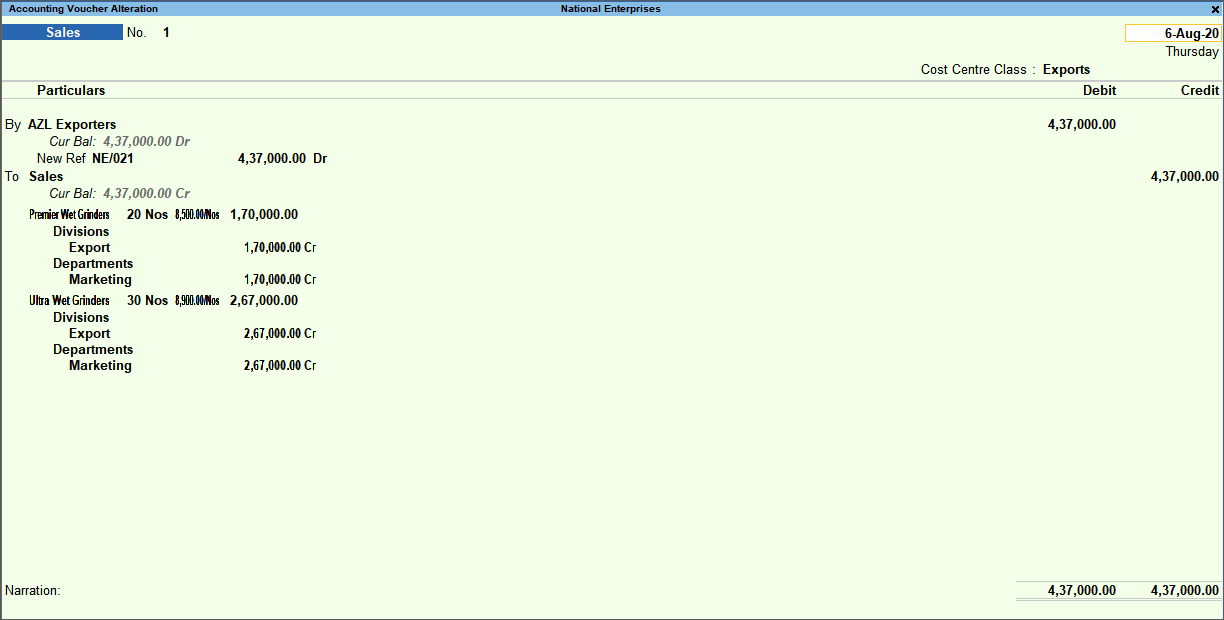
Let us use the cost centre class, Export in the sales invoice.
- Press Alt+G (Go To) > Create Voucher > F8 (Sales).
- Press F12 (Configure) > set Select Cost Centre/Class and to Yes.
- Select one of the Cost Centre Class, for example, Exports.
- Select the sales ledger and provide stock item details.

- Accept the voucher.
- Press Page Up > Ctrl+H (Change Mode) > select As Voucher. The cost centre allocation appears.
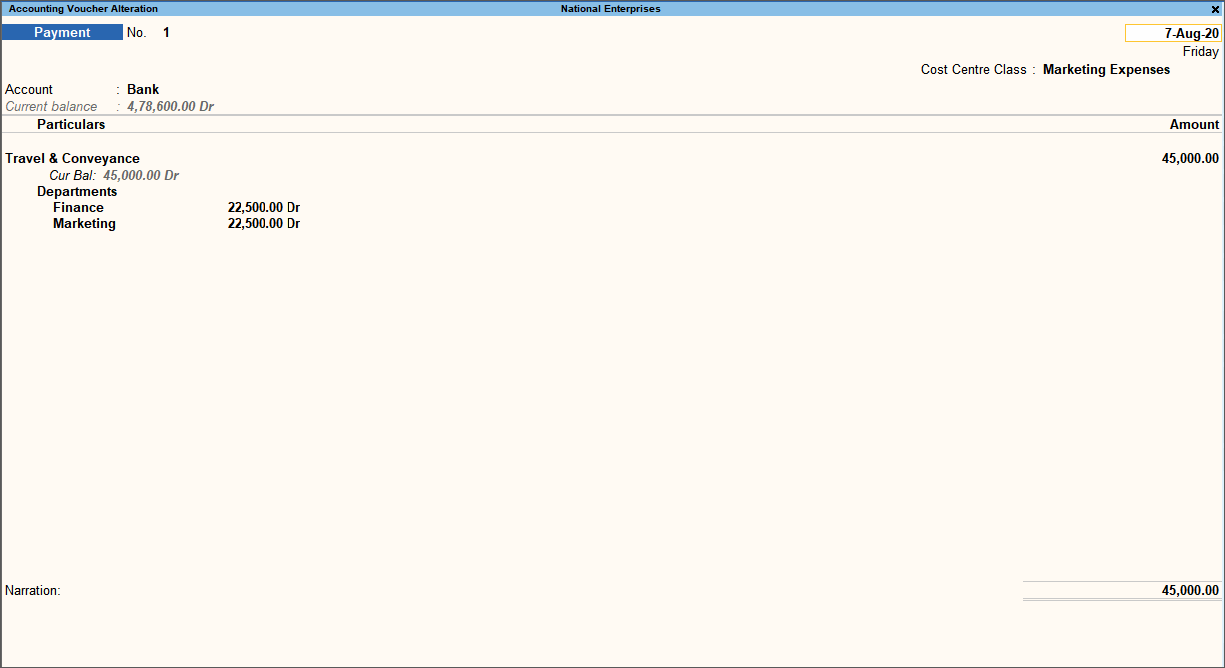
Similarly, record a payment voucher.
- Press Alt+G (Go To) > Create Voucher > F5 (Payment).
- Select the cost centre class, for example, Marketing Expenses.
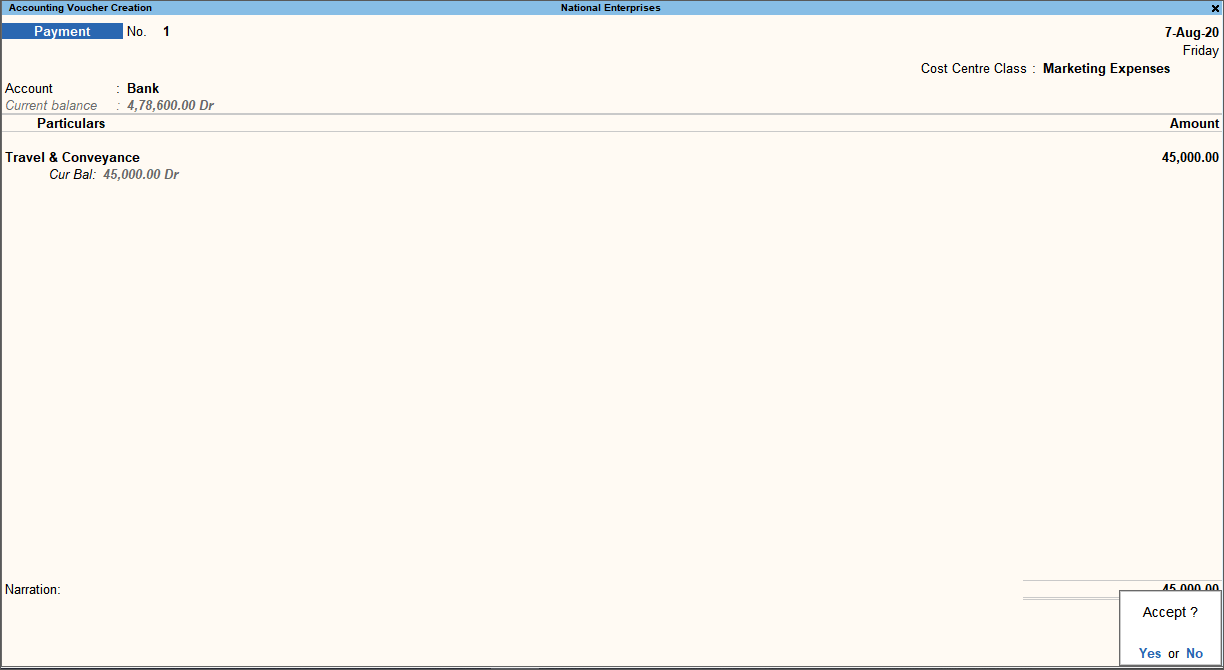
- Accept the payment voucher.
- Press Page Up to open the voucher in alteration mode. The cost centre allocation will be displayed.
To sum it up, TallyPrime enables you to track incomes and expenses incurred in the cost centres or profit centres of your business. Furthermore, you can create multiple cost categories for parallel allocation of cost centres or profit centres. You can use Cost Centre report capability in the product in order to view all the incomes and expenses incurred in a particular cost centre or profit centre.
Disable Cost Centre in TallyPrime
In TallyPrime, you may choose to apply cost centres for specific ledgers. Sometimes, you may have enabled cost centre for a specific ledger, and then you may want to disable it.
You may want to disable cost centres for ledgers in the following scenarios:
- An executive had mistakenly enabled cost centre for a specific ledger.
As a result, while recording transactions containing the ledger, you will need to specify cost centre. - You do not need cost centre for a specific ledger anymore.
- You do not need cost centre for any ledger.
In all the scenarios mentioned above, you have an option to disable cost centres.
Disable cost centre for a specific ledger
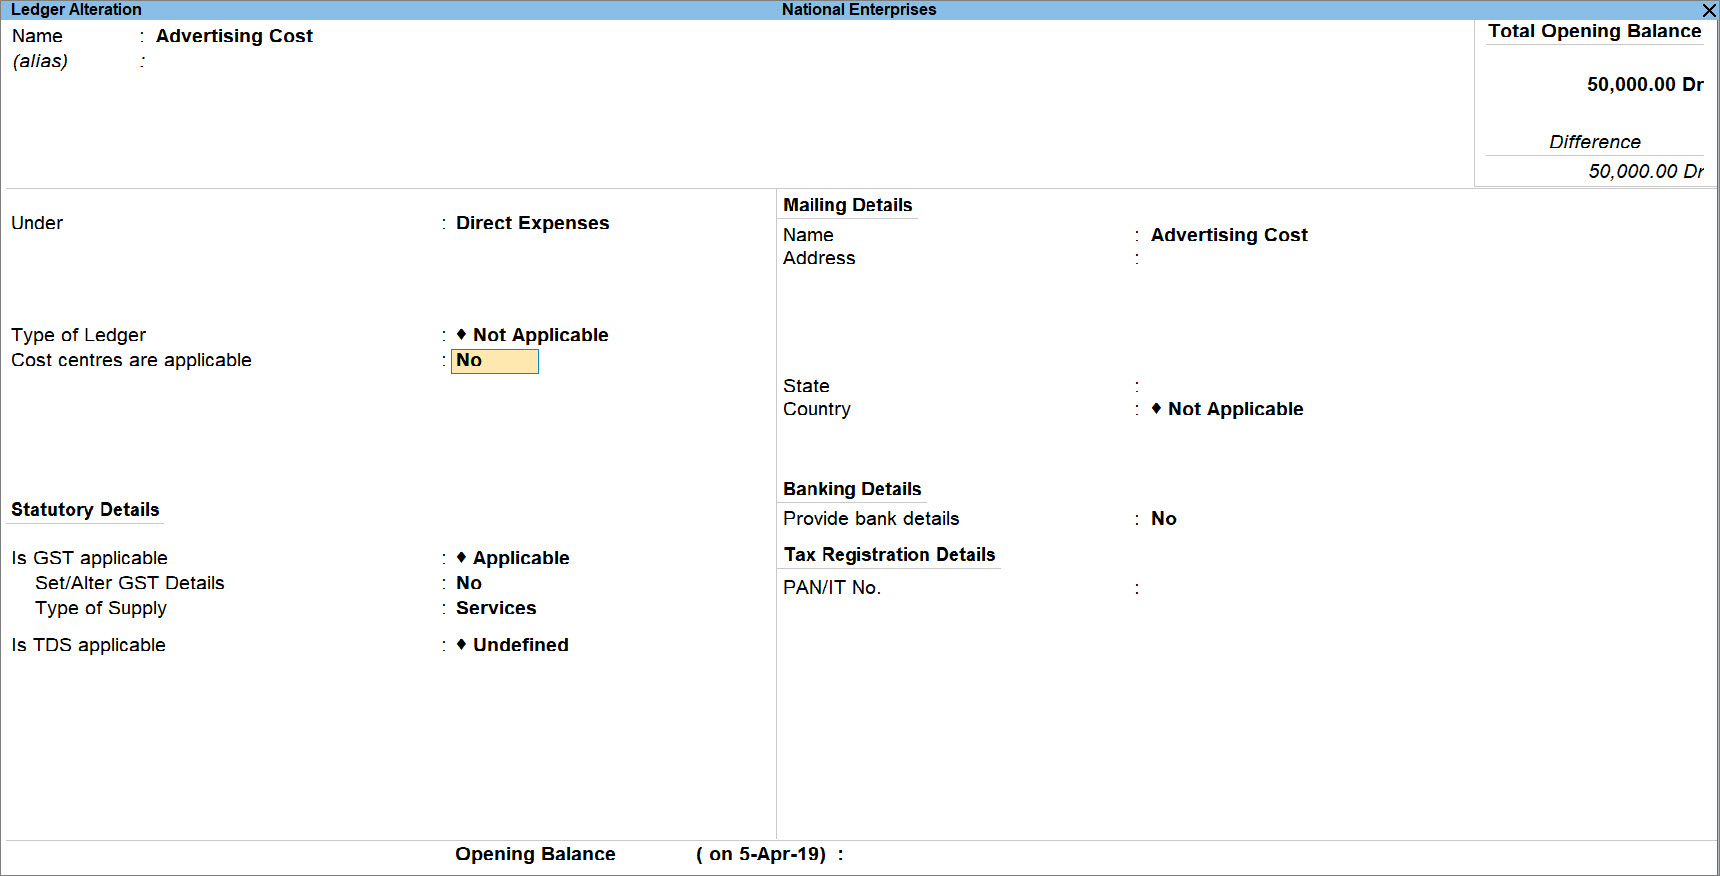
It may be possible that you have enabled cost centres for the advertising cost ledger. However, later on, you realise that you do not need cost centres for the advertising cost. In such a case, you may want to disable the cost centre for the advertising cost.
To disable cost centre for a specific ledger, follow the steps given below.
- Press Alt+G (Go To) > Alter Master > Ledger > type or select the ledger and press Enter.
- Cost centres are applicable: No.
 Henceforth, cost centres will not be applicable for this ledger, and you will not have to select cost centre for this ledger which recording transactions.
 - Press Ctrl+A to save, as always.
Disable cost centre for all ledgers
You may want to disable cost centres for all the ledgers, as you don't need to assign cost centres to the ledgers anymore. In such a case, you can disable cost centres for all the ledgers in TallyPrime.
Follow the steps given below.
- Press Alt+G (Go To) > Alter Master > Ledger > type or select any ledger and press Enter.
- Disable cost centres from ledger configuration.
- Press F12 (Configure).
- Apply Cost Centres for Ledger: No.
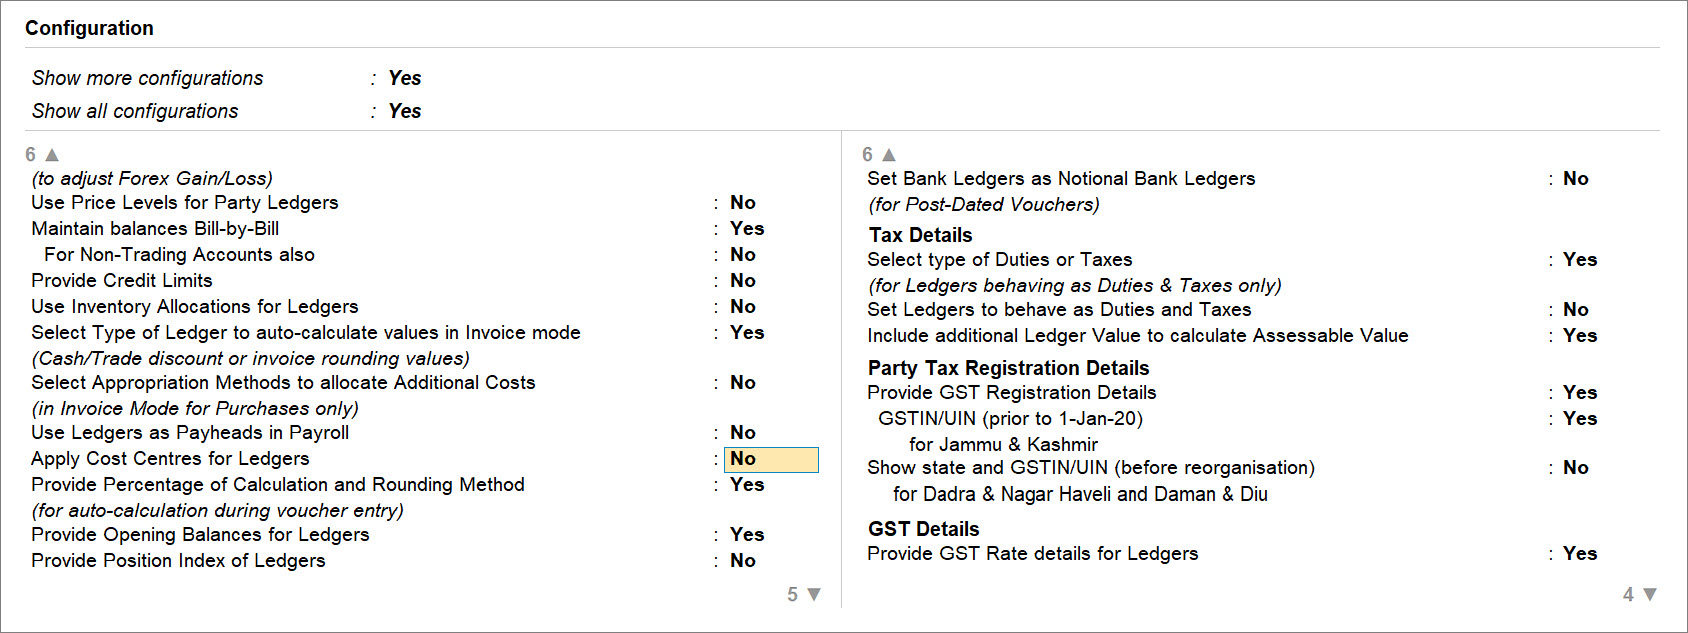
If you do not see this option, then set Show more configurations and Show all configurations to Yes. - Press Ctrl+A to save.
Henceforth, the Cost centres are applicable field will stop appearing in the ledger alteration and creation screens. Moreover, you will not need to assign a cost centre to any ledger while recording transactions.
If you want to apply cost centres for specific ledgers, then you will need to configure them afresh. You will need to set:
Apply Cost Centres for Ledger: Yes, in the ledger configuration screen.
Cost Centres are applicable: Yes, in the ledger alteration for those specific ledgers.
Source: https://help.tallysolutions.com/tally-prime/financial-controlling/cost-centre-or-profit-centre-tally/
0 Response to "There Are No Income Items to Allocate Click Next to Continue"
Post a Comment